Where to Place Your Water Leak Sensor Next to a Sump Pump
The Shipshape Method
There's a right way to put a water leak sensor on a sump pump. It's the same method our installers use on every install — straight from the Shipshape app's setup wizard. It catches basin overflow at the moment it happens, keeps the sensor's body and battery safely off the floor, and survives the next time you have a basement flood.
Two pieces of tape. Five minutes. Done.
The 1-2-3
Don't have the Shipshape app yet? You can mount and test the sensor without it. Pair it later when you're ready. The wet-finger test below confirms the sensor works without any phone setup.
1. Tape the sensor body to the discharge pipe
Using the double-sided sticky tape that came in the box, stick the body of the sensor to the white PVC discharge pipe that runs up out of your sump basin. Mount it on the upright section of pipe, 6 to 12 inches above the lid.
How to identify the discharge pipe: It's the white PVC pipe (usually 1.5" or 2" diameter) that runs straight up out of the basin lid and exits the basement through the rim joist or an outside wall. Don't mount to any copper, galvanized steel, black ABS waste pipe, or insulated lines nearby — those aren't part of the sump system.
2. Let the prongs fall to the basin lid
The probe is the small piece at the end of the cable with two metal prongs. Let it hang down and rest flat on the lid of the sump basin with the prongs facing down so they sit directly on the lid surface. The cable acts as a tether, keeping the sensor body up on the pipe while the prongs sit where overflow shows up first.
3. Test it with a wet finger
Wet a fingertip and touch both metal prongs at the same time. The sensor's LED should light up within a second. If you've paired it to the Shipshape app, you'll also get a push notification on your phone within about ten seconds. Wipe the prongs dry and the alert clears on its own.
If you don't have the app yet, the LED flash alone confirms the sensor is working — that's all you need today. Come back and pair it whenever.
If Your Sump Has a Sealed Lid With No Exposed Pipe
Modern radon-sealed sump covers (Triple Safe, Liberty, Zoeller, and similar) often have the discharge pipe grommeted right at the lid surface, with no upright pipe section above the cover to tape onto. If that's your sump, you have three good options:
- Mount the body higher up on the same pipe, above the lid where the pipe becomes vertical inside the rim joist. The probe cable is 5 feet — usually plenty to reach back down to the lid.
- Mount the body to a nearby joist, stud, or basement wall within 5 feet of the basin. Use the screw method (Option C below) or strong mounting tape.
- Rest the probe on top of the sealed lid near a weep/access point where overflow would first appear, and route the cable to wherever the body is mounted.
Don't punch through the sealed lid grommet to route the cable inside the pit — you'll break the radon/humidity seal and the probe will corrode inside the constant 100% humidity.
The Diagram
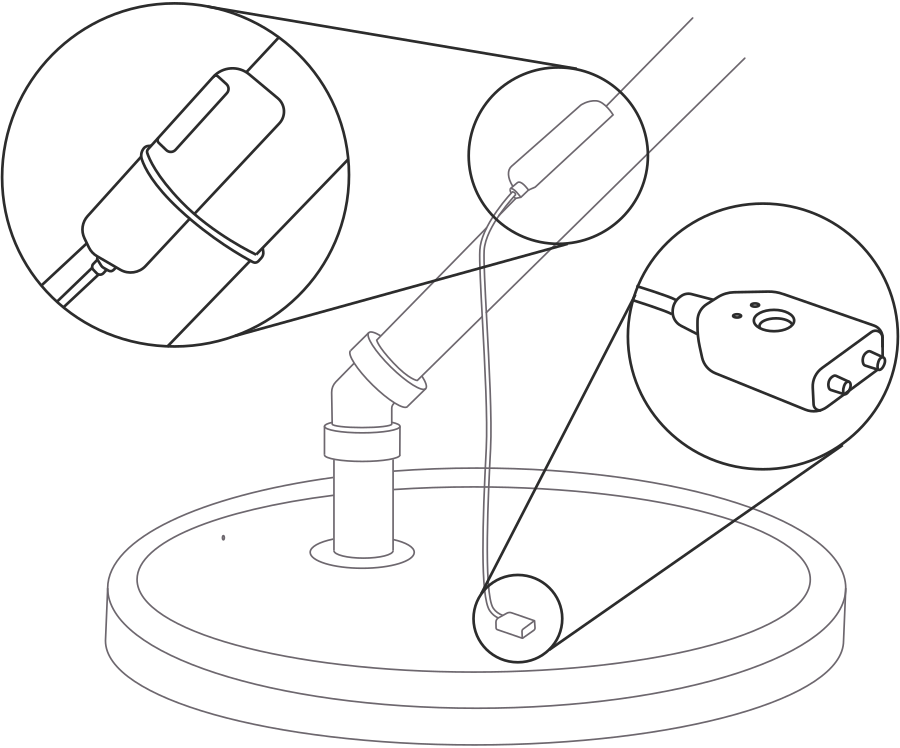
This is the placement view from the Shipshape installer wizard — the same picture our service pros see when they install a sensor at your home.
Pedestal pumps, submersible pumps, and battery backups
The Shipshape method is the same for both pedestal pumps (motor on a column above the lid) and submersible pumps (motor inside the basin) — body on the discharge pipe, prongs on the lid.
If you have a battery-backup pump, you'll see a second, smaller discharge pipe running up alongside the primary. Mount the sensor on the primary discharge pipe, not the backup line. The primary runs every storm; the backup only runs when the primary fails or loses power, and you want the sensor to see overflow either way.
Why This Specific Setup
There are four reasons we pick this exact placement, every install:
| Why | What it means |
|---|---|
| Detects basin overflow at the source | The prongs sit on the lid, which is where water first appears if the pump fails or the basin backs up. You get the alert before water spreads across the floor. |
| Battery never touches water | The body of the sensor (where the battery lives) stays mounted high on the PVC pipe. The 5-foot cable is a tether — the body never has to come down. |
| Survives a flood | When water does reach the basement floor, the sensor body is well above the waterline. The sensor keeps sending alerts during the exact event you bought it for. |
| No drilling, no plumbing work | Double-sided tape on a clean PVC pipe holds for years. You can move the sensor later if you need to. |
How the Sensor Triggers
The two small metal prongs on the probe are the trigger. When water touches both prongs at the same time, it bridges the circuit — the sensor wakes up and fires a Z-Wave alarm to your hub. From there, your phone gets a push alert in seconds, and your service professional (if you're enrolled) gets notified at the same time.
Both prongs have to be touching the same surface. If the probe is tilted on a bump or piece of debris and only one prong is in contact, the sensor will never trigger. Lay it flat.
What the LED Means
| LED behavior | What it means |
|---|---|
| Quick flash on first wake-up | Battery tab is removed and the sensor is alive. You should see this the first time you unbox it. |
| Blinking during pairing | Sensor is in include/pair mode, waiting to join your hub. |
| Flash on contact with water | Sensor detected water and sent an alarm. |
| No light at all when you touch the prongs with a wet finger | Battery tab is still in, the battery is dead, or the sensor isn't wired up correctly. |
About the Battery
The CR123A battery inside the sensor lasts about three years in a sensor that rarely fires. The Shipshape app will warn you when it drops below 15%, so you have time to swap it. CR123A is the same battery used in flashlights and older film cameras — easy to find at any hardware store, Amazon, or in the photo/flashlight aisle at a big-box retailer.
The battery cannot touch water. That's the whole point of the 5-foot tether — keep the body up on the pipe so even a flooded basement doesn't drown the electronics.
Signal Strength
The water sensor is battery powered, which means it has less radio range than devices that plug into an outlet. If your sump pump is in a basement or crawl space — and most of them are — you'll likely need a Shipshape Range Extender plugged in somewhere on the floor above to relay the signal from the basement up to your hub.
If you bought a Shipshape kit, this is already included. If you added the sensor yourself and your alerts seem laggy or unreliable, a range extender solves it.
If the Tape Won't Hold
This is the most common reason a sump pump sensor falls off the pipe a few months after install. Sump pump environments are tough on adhesives — humid air, cold PVC, vibration from every pump cycle. If the tape fails, the body drops, the probe pulls off the lid, and you stop getting alerts.
Here's why tape gives out and what to do about it.
Why tape fails on a sump pump pipe
| Reason | What's happening | Fix |
|---|---|---|
| Dirty or oily pipe | PVC picks up dust and skin oils that block the adhesive from gripping. This is the #1 cause. | Wipe the spot with rubbing alcohol (70% or higher) and let it dry fully before applying tape. Don't use vinegar — the residue can weaken the adhesive. |
| Pipe condensation | A cold PVC pipe in a humid basement sweats. The film of moisture between tape and pipe never lets the adhesive bond. | Dry the pipe thoroughly with a paper towel, then warm the spot with your hand for 30 seconds before pressing the tape on. |
| Cold basement | Below about 60°F, most double-sided tape adhesion drops by 30 to 50%. | Apply during a warmer time of day, or warm the pipe spot with your hand or a hair dryer for a few seconds before mounting. |
| Curved surface, small contact area | A round 1.5-inch pipe gives the tape less surface to grip than a flat wall. | Use a wider piece of tape that wraps further around the pipe, or switch to one of the more reliable mounts below. |
| Pump vibration | Every time the pump cycles, the discharge pipe shakes slightly. Over months, this works the tape loose. | Switch to zip ties — see Option A below. They don't care about vibration. |
| Not enough pressure when applied | Pressure-sensitive adhesive needs firm pressure to flow into the surface. | Press the body against the pipe with one finger and hold for a full 30 seconds. Don't let go early. |
| Second liner not peeled off | Double-sided tape has a release liner on both sides. Easy to forget the second one. | Confirm both sides feel sticky before mounting. |
More reliable ways to secure the sensor
If the included tape keeps failing in your basement (or you just want something bulletproof from day one), here are the alternatives ranked from easiest to most permanent.
Option A — Zip ties (best free upgrade)
Wrap two small zip ties around the body of the sensor and the discharge pipe. Trim the tails. This is the most reliable mount short of drilling. Zip ties don't care about humidity, condensation, vibration, or temperature. A 10-pack costs about $3 at any hardware store. Combine with the included tape for belt-and-suspenders.
Choose UV-resistant nylon zip ties if your basement gets sunlight from a window — standard ties get brittle after a few years of UV exposure.
Option B — Stronger double-sided mounting tape
If you prefer tape, upgrade from the standard tape in the box to a heavy-duty mounting product:
- Gorilla Heavy Duty Mounting Tape (clear or black) — holds up to 30 lb per square foot, designed for textured surfaces.
- 3M VHB (Very High Bond) tape — the industrial standard, used on car badges and signage. Once it cures (24 hours), you're not getting it off without solvent.
- Scotch Extreme Mounting Tape — middle ground, easier to find at drugstores.
Clean the pipe first (same alcohol wipe). Cut a strip slightly smaller than the sensor's back surface. Press firmly for a full minute.
Option C — Plastic P-clip and a screw
Pick up a 1/2" or 3/4" plastic P-clip (also called a cable cushion clamp) from any hardware store — about $2 for a pack of ten. Screw the P-clip around the discharge pipe into a nearby joist or floor framing. The clip wraps the pipe; the screw anchors it to wood. This is what installers use when they want a vibration-proof mount without tape.
You then tape or zip-tie the sensor body directly to the P-clip's flat surface (much better adhesion than to the curved pipe).
Option D — Mount to a nearby stud or joist with a screw
If there's a wood floor joist, basement stud, or wall surface within the 5-foot probe cable range, you can mount the sensor body to wood instead of to the pipe.
Many leak-sensor units (including the Aeotec 7 Pro) have a small screw hole inside the battery compartment for wall-mounting; check yours before drilling. Use any small #6 wood screw — if your box came with screws and wall anchors, they're ideal; if not, hardware-store screws are fine.
- Hold the sensor body against the wood/wall at the spot you want it.
- Drive a small wood screw through the mounting hole into the wood.
- Run the probe cable to the basin lid as normal.
This is the most permanent mount and the best choice if your basement runs cold or damp enough that no tape lasts. Requires a drill or screwdriver.
Option E — Velcro strap (for easy battery swaps)
A 1-inch wide hook-and-loop strap (Velcro One-Wrap, ~$5 for a pack) around the pipe lets you pop the sensor off easily for battery replacement. Slightly less secure than zip ties but still resistant to humidity. Best if you anticipate needing to remove the sensor often.
What we recommend, by situation
| Your basement | Use this |
|---|---|
| Dry, finished, warm (>65°F) | Included tape is fine. Clean the pipe and apply firmly. |
| Humid or unfinished basement | Zip ties — single most reliable upgrade. |
| Cold basement (under 60°F) | Zip ties OR Gorilla / 3M VHB tape. |
| You've already had tape fail once | Zip ties + tape together. |
| Sump cycles a lot and you want it bulletproof | P-clip + screw into a joist (Option C). |
| You don't mind a permanent install | Screw the sensor body to a nearby joist (Option D). |
Other Common Mistakes to Avoid
| Mistake | Why it fails |
|---|---|
| Probe sitting in standing water inside the pit | The probe detects water touching it. It's not designed to live in water — submerged contacts corrode in months. |
| Sensor body taped low on the pipe | The body's battery can't touch water. Tape it high enough that even a flooded basement keeps it dry. |
| Probe under the discharge pipe drip path | Older check valves drip a few drops per pump cycle. You'll get nuisance alerts every storm. Move the prongs to a different area of the lid. |
| One prong on the lid, one prong on a cable or piece of tape | The sensor only triggers when both prongs touch the same conductive surface. Lay the probe perfectly flat. |
| Cable pulled tight across the basin | A taut cable rips the probe out of position the first time the pump cycles hard. Leave a gentle loop of slack. |
| Mounted to a metal pipe instead of the white PVC | The discharge line is PVC. Don't mount it to a copper or galvanized water-supply line nearby — those aren't part of the sump system. |
Test Before You Walk Away
The wet-finger test is fast and reliable. Wet a fingertip and touch both prongs at the same time:
- Sensor LED flashes within a second — the sensor itself is working.
- Push alert on your phone in about ten seconds — pairing to your hub is working too.
- Wipe the prongs dry — the alert clears automatically.
If the LED never flashes, the battery tab is still in place or the battery is dead. If the LED flashes but no push arrives, the sensor isn't paired to the hub yet, or the basement signal is too weak (add a range extender).
What Happens When It Fires For Real
The instant the prongs detect water, your Shipshape hub fires a push notification to every phone connected to the home. If you've enrolled with a service professional through Shipshape, your provider is notified at the same time with the sensor location and timestamp — so they can reach out before you've finished drying off the probe.
Water leak alerts are classified as critical in the system: no delay, no batching, and the sensor repeats the alarm every five minutes for as long as it's wet.
Maintenance
- Battery — CR123A. Three-year life on a sensor that rarely triggers. The app warns you when it drops below 15%.
- Annual test — Wet the prongs once a year (the first warm rain of spring is a good reminder) and confirm you still get the alert.
- Probe check — Look at the prongs every spring. If you see white or green crust (mineral buildup from hard water), wipe with a damp cloth. Heavy oxidation can be polished off with a fine emery board.
- Tape check — Once a year, gently push on the sensor body to confirm the tape still holds. Re-tape if it shifts.
Related Reading
- Aeotec Water Sensor 7 Pro & Shipshape Water Leak Detector — Full specs and Z-Wave parameters.
- Sensor Placement Guide for Homes — Room-by-room sensor placement.
- Sump Pumps — How sump pumps work and when to replace them.
- Smart Home Hub — Pairing instructions and Z-Wave basics.